Google Voice is a service by Google that allows you to use a virtual number as any other mobile phone number to use it for making and receiving calls. Also, like any other mobile number, you can also configure a voicemail on Google Voice number and use it as the default voicemail.
This article guides you through the steps to configure a voicemail on Google Voice and use it as the default Voicemail and forward the calls to it. For those who are not familiar with Google Voice number and don’t know how to get one, follow the article here: What is Google Voice Number and how to get it?
What is Voicemail on Google Voice?

A Google Voice number voicemail is quite similar to a voicemail on your phone. The voicemail lets you forward incoming calls(for certain conditions) to a cloud-based answering machine where the caller can leave a voice note for the receiver.
Later the user can access voicemail by dialing the voicemail number and retrieving or listening to the voicemail recorded by the caller. You can follow the guide here to configure and access Voicemail on Android.
To configure the Google Voice number as the default Voicemail all you is to get a Google number first.
Once you have the Google Voice number follow the steps below to set up the Google Voice number as the default Voicemail.
How to Set Up Voicemail on Google Voice
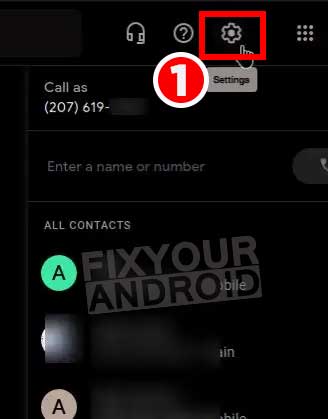
- Login to your Google Voice account on PC.
- Click on the Gear icon to open settings in the upper right corner.

- Now click on the ‘Voicemail’ option on the left sidebar menu to open the other settings to get ready for the first usage of Voicemail.

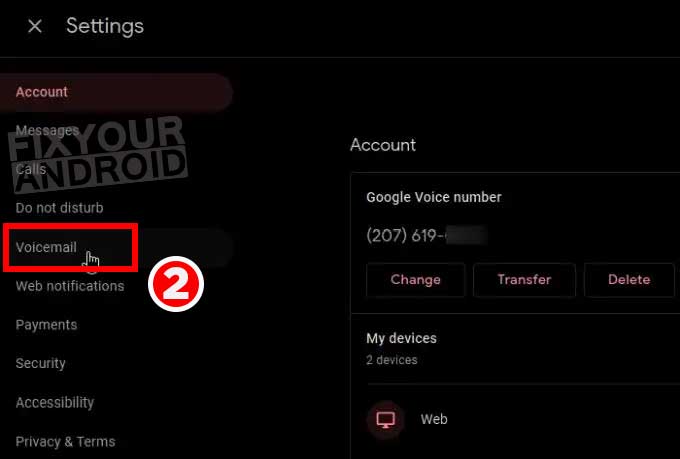
These settings contain two other settings;
1. Voicemail Greeting Settings
This allows you to record, delete and manage the greeting message for the voicemail.
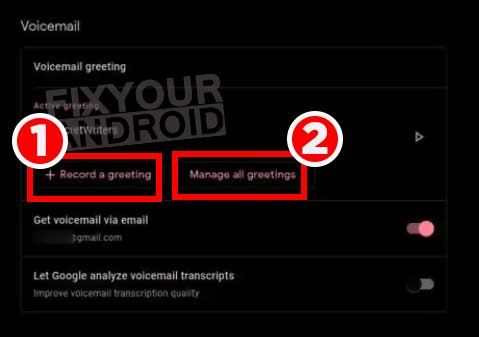
Record a greeting:
Tap on the ‘record a greeting’ option to record a message that will be listened by the caller when they call on your Google Voice Voicemail. You can record greeting messages for a duration of 3 minutes.
Once you have done recording, click on ‘stop’ and ‘save’ to end it. Now, you can either set this as a greeting message for callers or click on ‘redo’ to record the greeting message again.
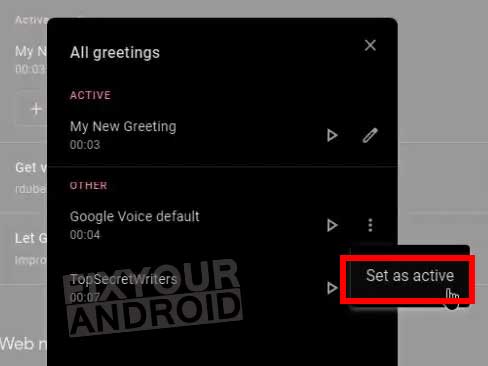
Manage all greetings:
This setting allows you to select a default greeting for the voicemail. You can also delete the previously recorded greeting under this tab. You’ll always see your current active greeting listed in the Active greeting section of the Voicemail greeting box.
2. Get voicemail via email
This setting can be used to get the transcript of the received voicemail as a text file directly to your Gmail. This means, when you toggle on the ‘Get voicemail via email’, the voicemail will be converted from audio to text and will be sent to the Gmail account associated with this Google Voice account.
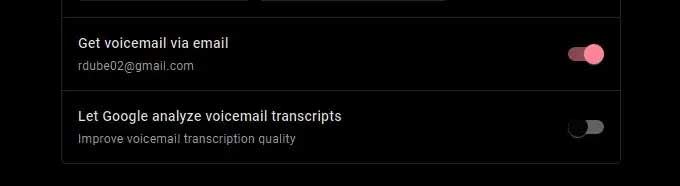
This is called Visual Voicemail and it’s optional. You can decide to toggle it on or off.
You get another option ‘Let Google analyze voicemail transcripts’. This is a privacy setting option. Enabling it gives Google permission to access your voicemail transcripts for the purposes of tweaking and improving their voicemail transcription algorithm.
Beyond this, you can find other voicemail settings where you can configure other settings for Google Voice Voicemail.
Other Google Voice Voicemail Settings
Once you have configured the Google Voice Voicemail. It’s time to set it to use as the default Voicemail.
Most mobile phone carriers offer a feature called Conditional Call Forwarding (CCF) or No answer/busy transfer. You can set up this feature on your mobile number to forward busy or unanswered calls to your Google Voice voicemail.
Here is how you set Google Voice Voicemail as the default Google voicemail.
Set Google Voice Voicemail as Default Voicemail
Step 1- Forward all calls on Google Voice number to Voicemail
Just above the Voicemail settings section, there’s a Do Not Disturb box with another voicemail setting. Enable this to forward call to Google Voice voicemail instead of Google Voice number.

Once done. it’s time to set Google Voice number as the default voicemail.
Step 2- Set Google Voice Voicemail as the default
Most mobile phone carriers provide a feature called Conditional Call Forwarding (CCF) or No answer/busy transfer. To send busy or unanswered calls to your Google Voice voicemail, set up this feature on your mobile number.
Verizon Wireless
Verizon Wireless has 2 methods to control conditional call forwarding: star (*) commands, or a menu on their customer website. You can use either method.
To turn on conditional call forwarding, enter the following 3 commands one at a time on your phone’s keypad, and wait for confirmation. After entering each command, tap Send or Call, hang up, and enter the next command. Replace 1234567890 with your Google Voice number.
- Call forward if unanswered: *61*1234567890#
- Call forward if unreachable: *62*1234567890#
- Call forward if busy: *67*1234567890#
How to Configure and Access Verizon Voicemail on a Land Line
AT&T Wireless
To turn on conditional call forwarding, enter *711234567890 on your phone’s keypad, wait for the confirmation stutter tone, then hang up.
For another network, you can call customer care and ask for the conditional forwarding number and follow the steps above.
Congratulations! You have just set your Google Voicemail as the default voicemail on your phone. For those who are not still confused, let’s understand this;
How does it Work?
When a caller calls on your number, and here I assume that you have set a condition to forward all incoming calls to voicemail, the call will be directly forwarded to the Google Voice number.
Now, we have set Google Voice number to forward all calls to Voicemail(in this step). The caller will listen to the greeting messages you have recorded on your Google Voice account and record their message.
Checking Voicemail on Google Voice
You can check for newly received voicemail by simply logging into your Google Voice account and selecting Voicemail from the left navigation panel, you’ll access your list of recent voicemail messages.
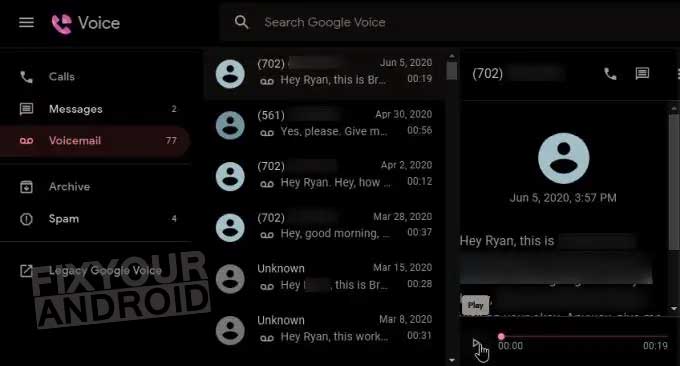
You can also select any message to see the transcript of the voicemail. You can select the play button under this transcription to listen to the message.
Deleting received Google Voice Voicemails
To delete a Voicemail on Google Voice, you navigate to Voicemail; in your Google Voice account.
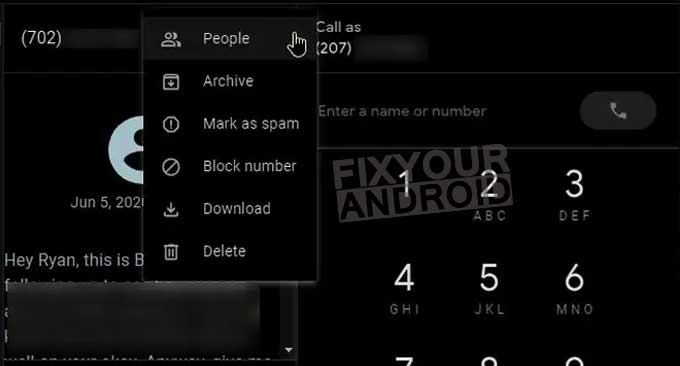
From the voicemail tab, select a voicemail and click on the three dots button to delete, archive, block, or mark as spam. Here select ‘delete’ option to delete the voicemail.
Cancel Voice Voicemail as Default Voicemail
Verizon Wireless
To turn off conditional call forwarding, enter *73 on your phone’s keypad, wait for the confirmation stutter tone, then hang up.
AT&T Wireless
To turn off conditional call forwarding, enter the following 3 commands one at a time on your phone’s keypad, and wait for confirmation. After entering each command, tap Send or Call, hang up, and enter the next command:
- Call forward if unanswered: ##61#
- Call forward if unreachable: ##62#
- Call forward if busy: ##67#
What Is AT&T Locker App? What is it Used for? How to Remove it?
Final Words:
Using Google Voice Voicemail is quite easy and it’s a cost-free method to manage your voicemail. You can set up and use Google Voice voicemail to receive and manage voicemail on Android and ios phones for free. And the cherry on the cake you can also configure your Google voice voicemail to send the received audio voicemail as text directly on your email address,
Simply put, when you activate voicemail on Google Voice, it operates smoothly without any hassle. It also brings the benefit of convenience, offering a designated space to save incoming calls. This allows you to access them whenever it suits you, according to your own timeline and schedule.