Where are contacts stored on Android? Is there a specific location on Android internal storage where all the saved contacts are stored on the Android device? Can we store contacts on an external SD card on Android? These are questions we have been asked by Android users several times. So here is the complete guide to Android contacts and their location.
The cherry on the cake this article also explored some troubleshoots to Android contacts like taking contacts backup, restoring deleted contacts etc.
Android devices are equipped with some amazing features to save you from an awful situation.
One of them is the contacts app that comes pre-installed as a system app. It helps you to manage your contact list such as removing, adding, assigning new names, updating, etc.
But the day will come when the app suddenly stops working, leaving you helpless. Because you are badly in need of the contacts that are stored in your phone.
So, to avoid this unpleasant situation, it is always a good practice to keep backing up your contacts.
But before that, in the early step, you have to know where are contacts stored on Android in order to make the process simpler and smoother.
Android Contacts Structure
As an Android user, you are quite familiar with the contact function of your help. But have you ever wondered in what way the structure of almost every Android contact is developed? Let’s have a glimpse at this.
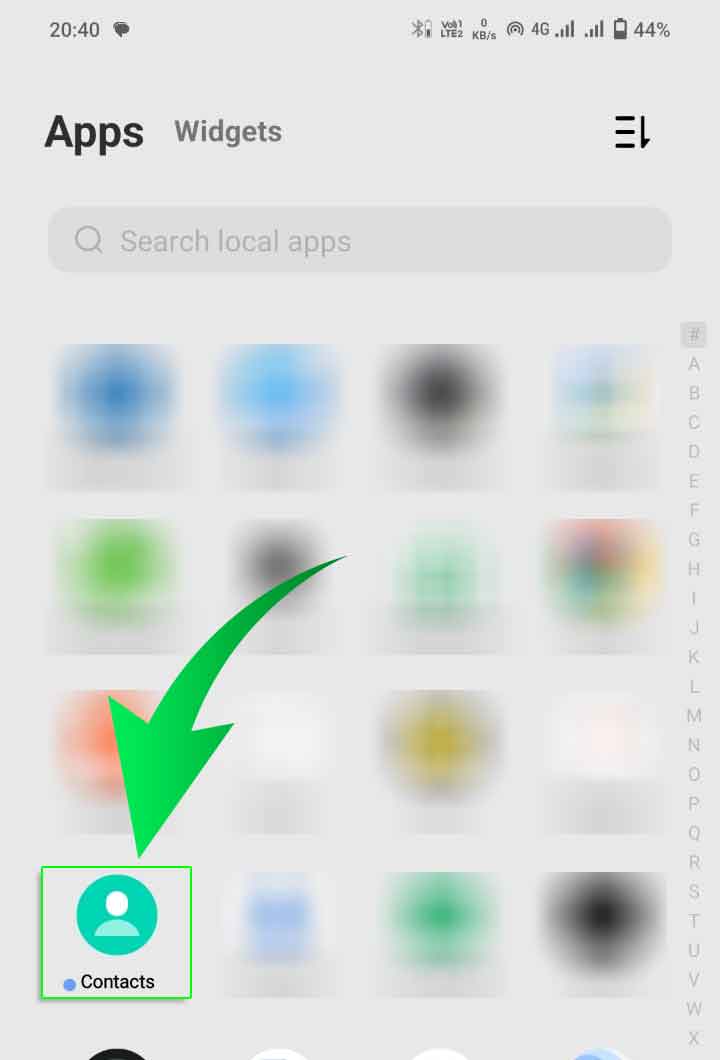
Head over to the app drawer find the contacts app and hit the icon to see the list of your contacts.
Now hit on each contact. After opening each contact, you will see tons of info related to the contact. The info can include:
- Email ID (you can record the mail type as work, home, mobile or other)
- Phone number. Again the type can be home, mobile, work, or other
- Nickname
- Address
- organization( includes job description company name, office location, title, department, etc,)
- Instant message, the protocol can be skype, qq, icq, etc)
- Photo
- Identity
- Website
- Note
- Group(If the person and you are a part of a group message)
Check Where Are Android Contacts Stored on Your Phone
If you are wondering, “Where the contacts are stored on Android?”. You can check it yourself.
Follow the steps to know the default saved location of contacts on your Android;
- Open the Contacts app on your Android.
- Tap on Contacts tab at the bottom of the app screen.
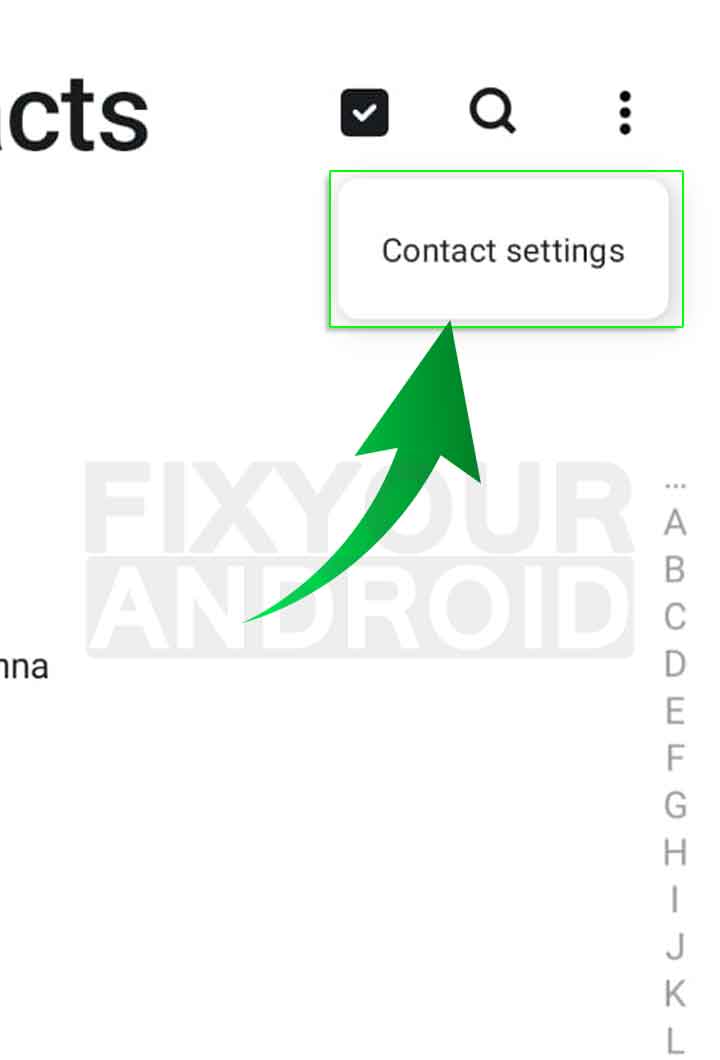
- Select “Contact Settings” from the action menu(three dots at the top right corner)
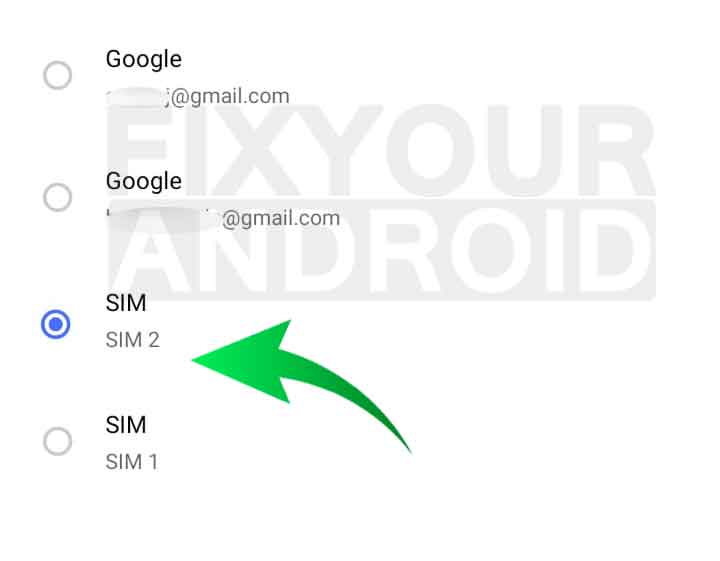
- Here a ‘Radio Button’ indicates the default contact saving location on your Android.
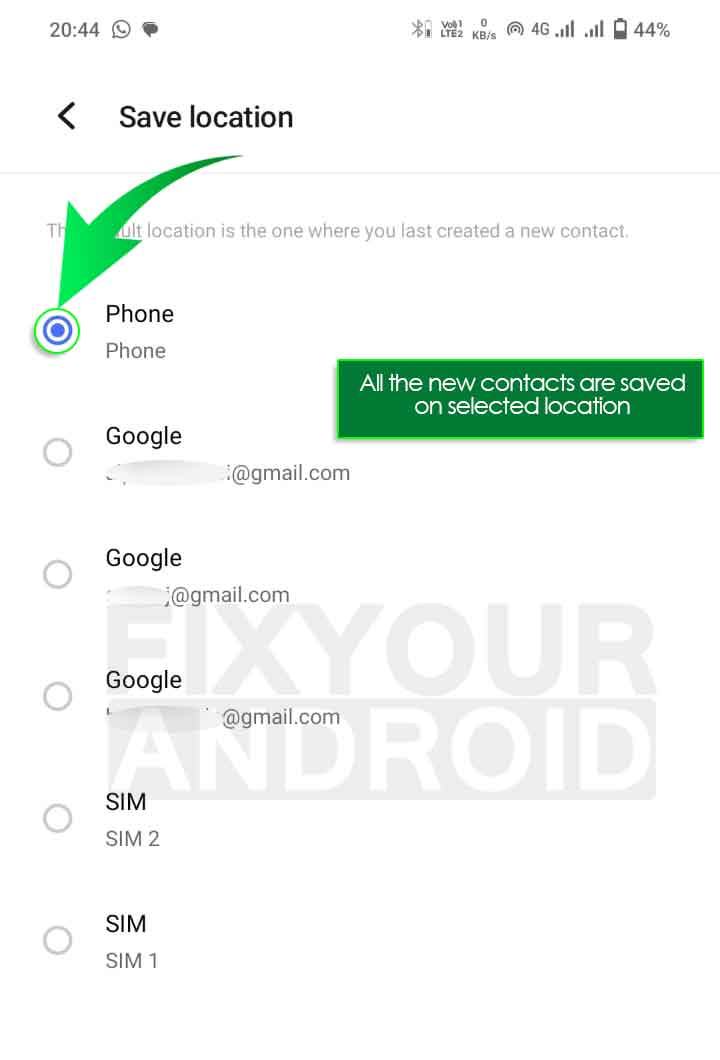
You can also change the default contact saving location you wish to save the new contacts to after you have exported all the contacts to the preferred location.
Where Are Contacts Saved On Android And How Can You Find Them
Truly speaking, the location of the contacts database varies based on the mobile phone manufacturer.
That means, there is no exact location where you can find them easily. But in an ideal world, most of the time you can locate them on the following directory.
/data/data/*.providers.contacts/databases/*.db
You should not mind finding the database of the contacts in SQLite 3 format. Because you will be capable of accessing them with the help of tools like DB browser or SQLite man on your computer.
You can find the DB Browser for SQLite on various platforms quite easily. After that, you will be able to see all the contacts of your Android phone and eventually reuse them on another device.
But as we said earlier, this method works only in an ideal world. In our actual world, two vital factors will keep you away from implementing the method. These factors are:
- Lack of stock Android: Most Android phones come with a custom interface. Hence you might be unsuccessful in locating the above directory since the manufacturer of the phone may change the path.
- Need of a rooted phone: To access the database you will need to root your phone. However, not all users are willing to root their phones. So the method is not going to work for them.
Where Are Contacts Saved On Android Internal Storage
The contacts on Android can be stored in different locations subject to availability. The major location to save contacts on Android si the internal storage, SIM card, and SD card or external storage.
Android devices come with a dedicated fixed storage capacity called internal storage. If you are searching for your contact list in the internal storage of your Android device, but can’t find the exact location unless your Android device is rooted. Do not worry at all.
Still, it is possible to see the saved contacts on Android internal storage using a file explorer app like ESfilexplorer.
Here is how to access contacts locations on Android internal storage.
- Open Play Store, download and install ESFileManager on Android.
- Open the ESFileMaanger app.
- Tap on internal storage.
- Here navigate to the following location
/data/data/com.Android.providers.contacts/databases/
- You will see files named contacts.db here.

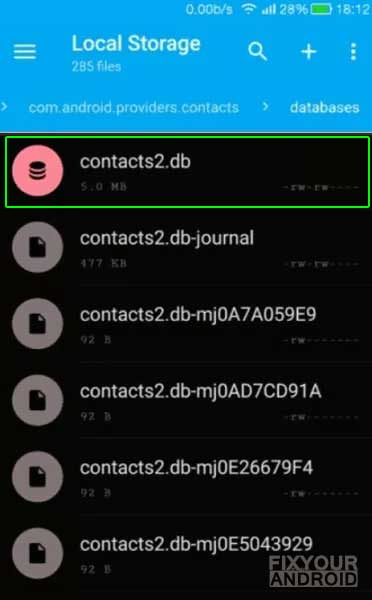
These are files that are used by the Android system to save the contacts on your Android device.
Additionally, all the stored contacts are not saved with the VCF file format but you can find them as SQLite 3 files, that are not at all easy to open. To open this specific file format, you need a program such as SQLiteman and DB Browser.
Read Also: What is com.samsung.android.contacts?
Access SIM Card Contacts Saved On Android
Step 1
Open Contacts App on your Android and tap on the Contacts tab.
Step 2
Tap on Contact Settings from the action menu(three dots at top right corner).
Step 3
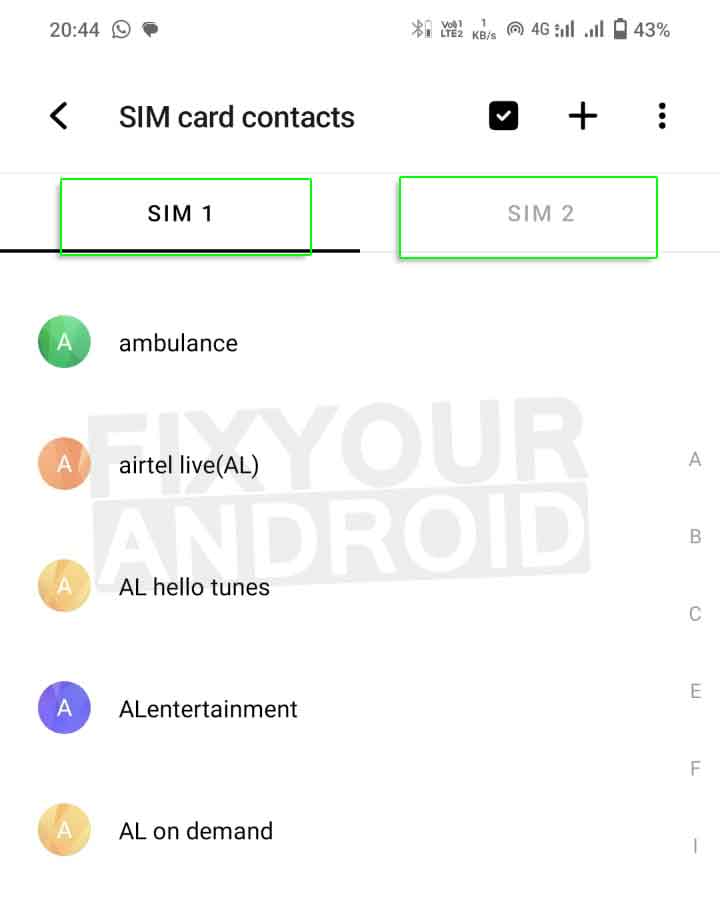
Here Tap on SIM card contacts.
You will see all the contacts stored on your SIM card. In the case of a dual SIM card, you can navigate to the SIM by tapping on the SIM numbers.
Access SIM Card Contacts Saved On Android 11 and Later
It is easy to access SIM card contacts on Android phones running on Android 11 and later.
- Open the contacts app on Android device.
- Here tap on the icon at the right top corner of the app.
- Select the SIM card from the list.
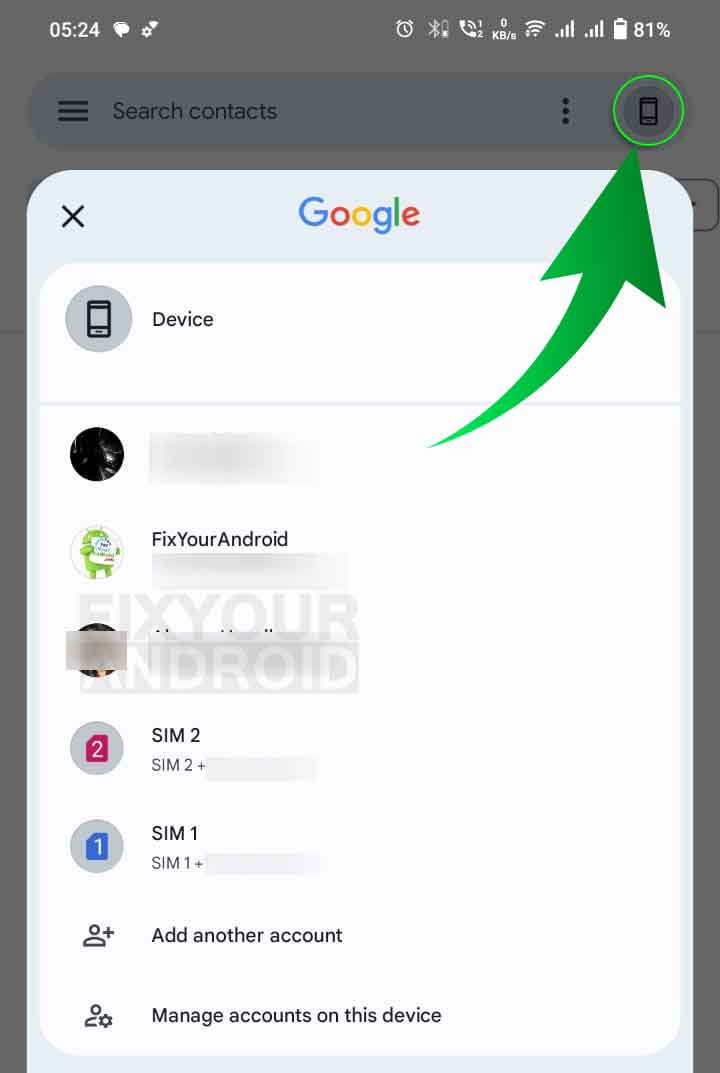
This will display all the contacts saved on the selected SIM.
Copy Contacts from SIM to Phone on Android
On modern Android phones, the default contact location is set as phone or your Gmail account. In such the contacts saved on SIM cards are not visible on the contacts app or any other dialer app.
So to make it visible either you can view SIM card contacts using the methods above or export all the SIM card contacts to your phone.
Here is how you Export SIM contacts on Android
- Open the Phone App on your Android and tap on the Contacts tab.
- Tap on Contact Settings from the action menu(three dots at top right corner).
- Here Tap on Copy contacts.
- Select Copy From SIM 1/2.
- Select the contacts from the list you wish to copy from SIM.
- Now, tap on the Copy button at the bottom.

- Select the location where you wish to copy the selected contact.

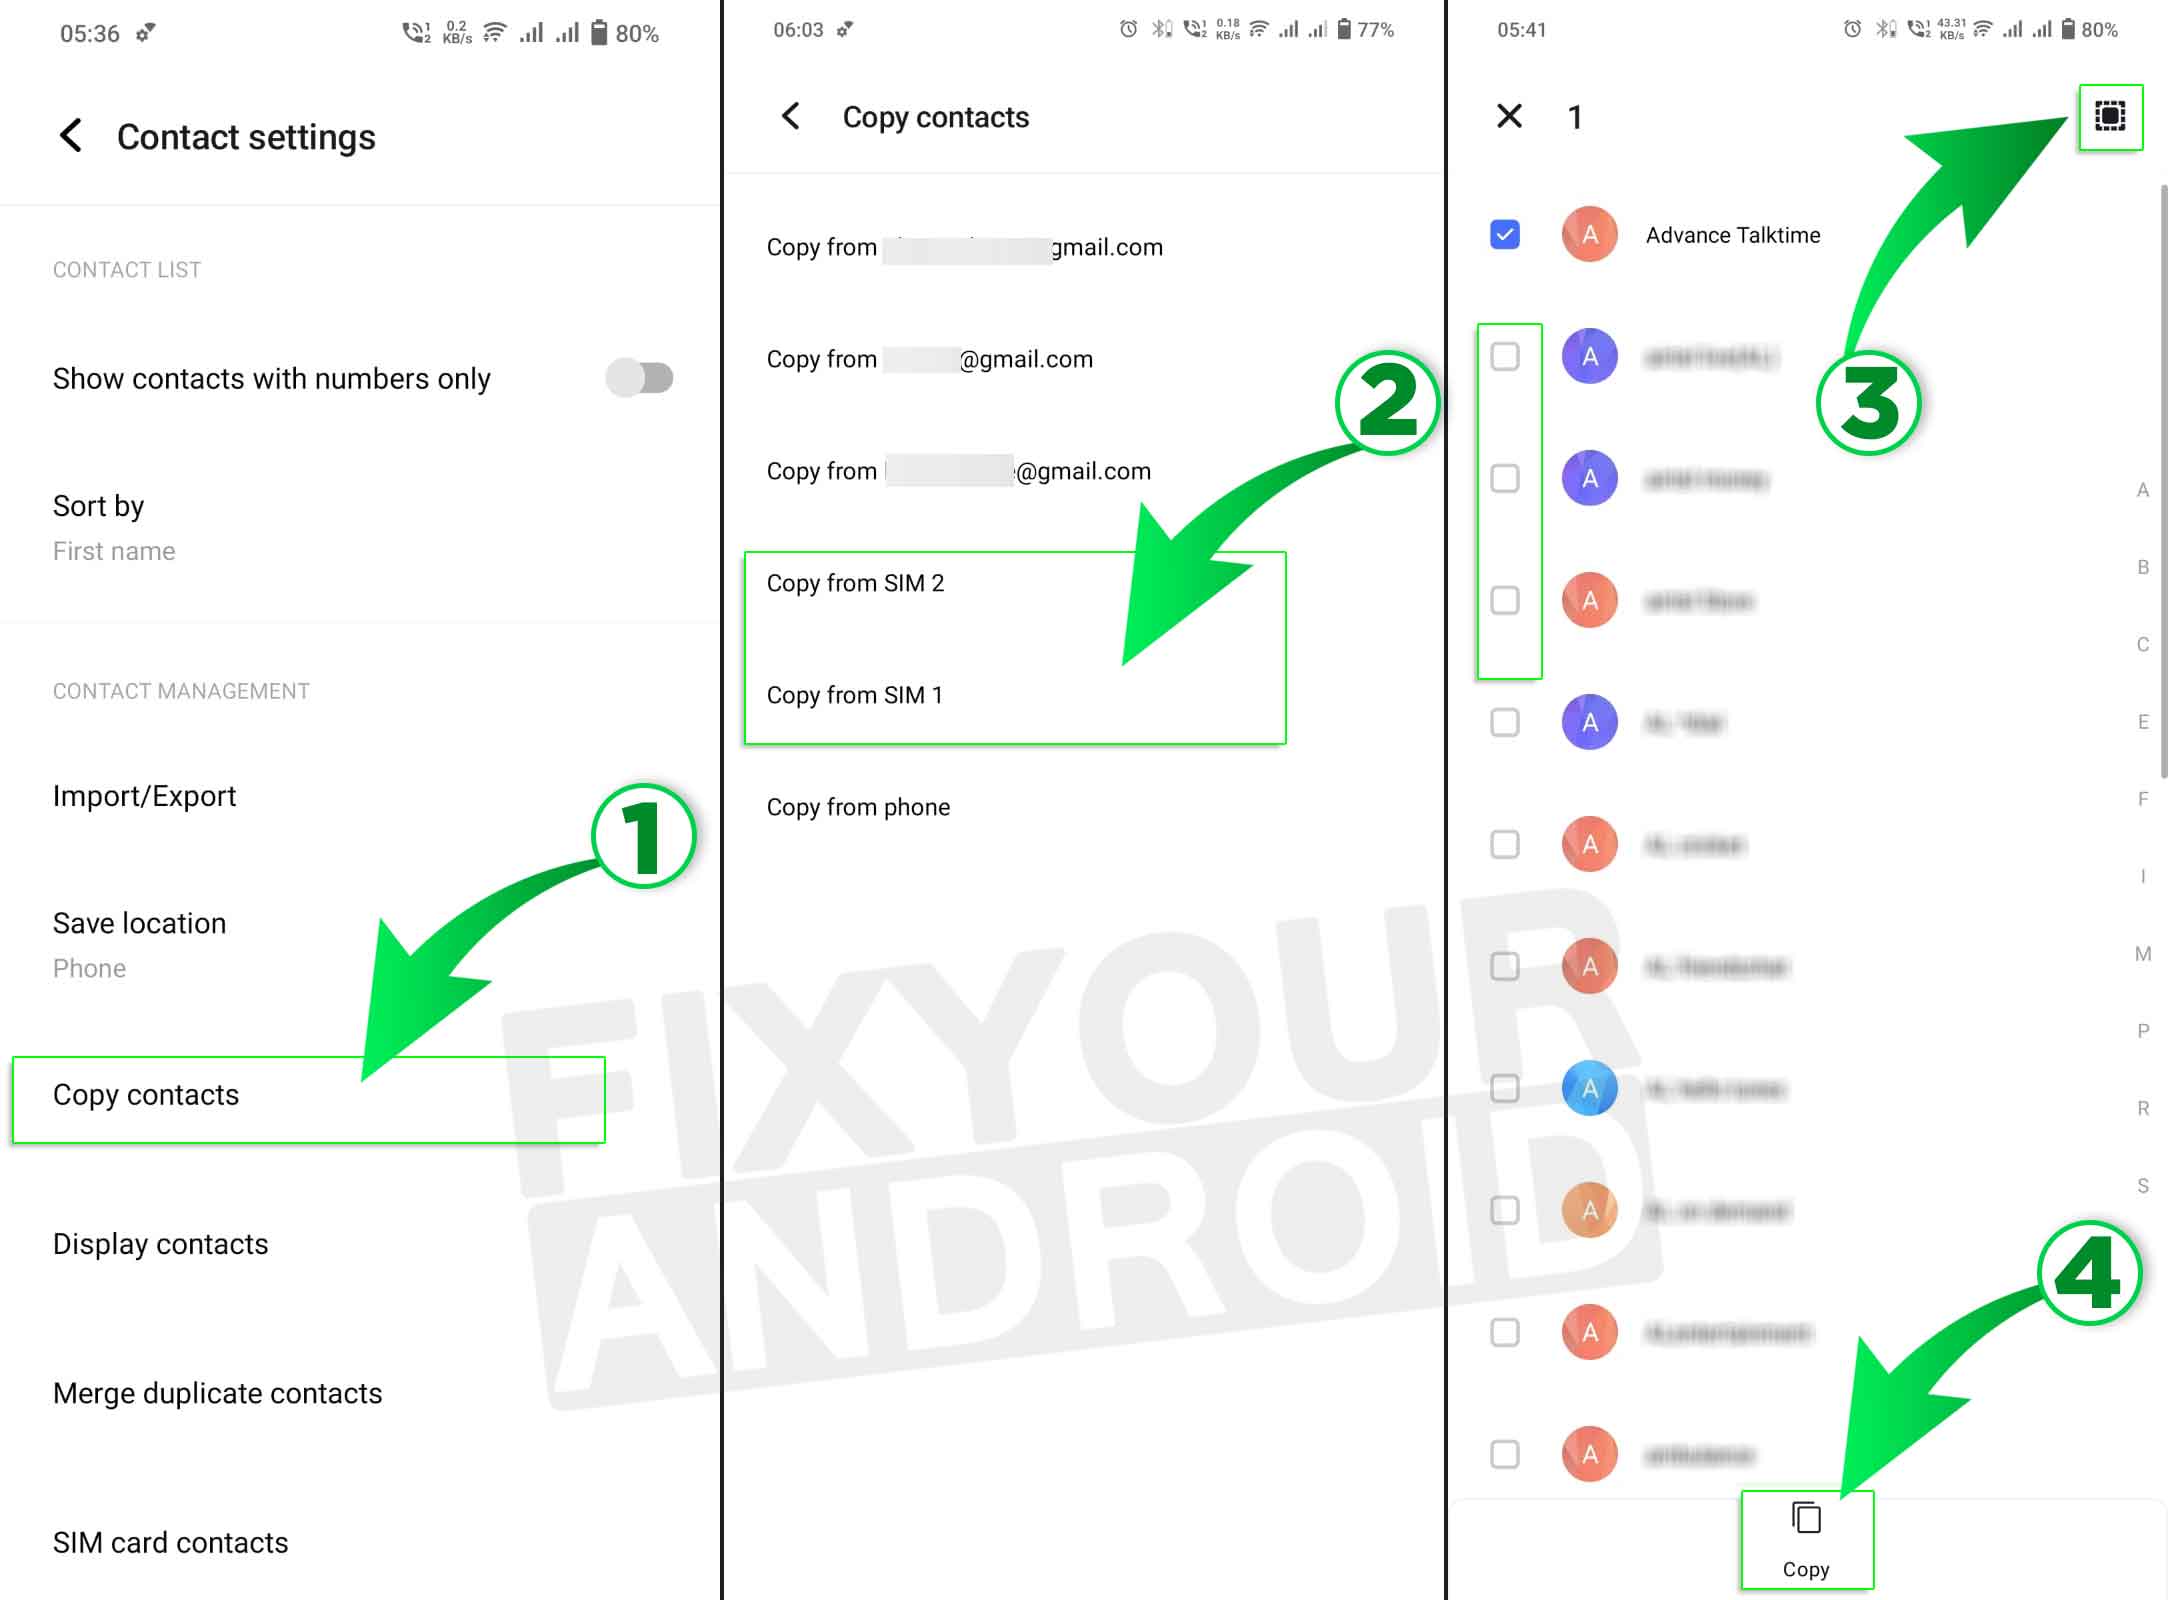
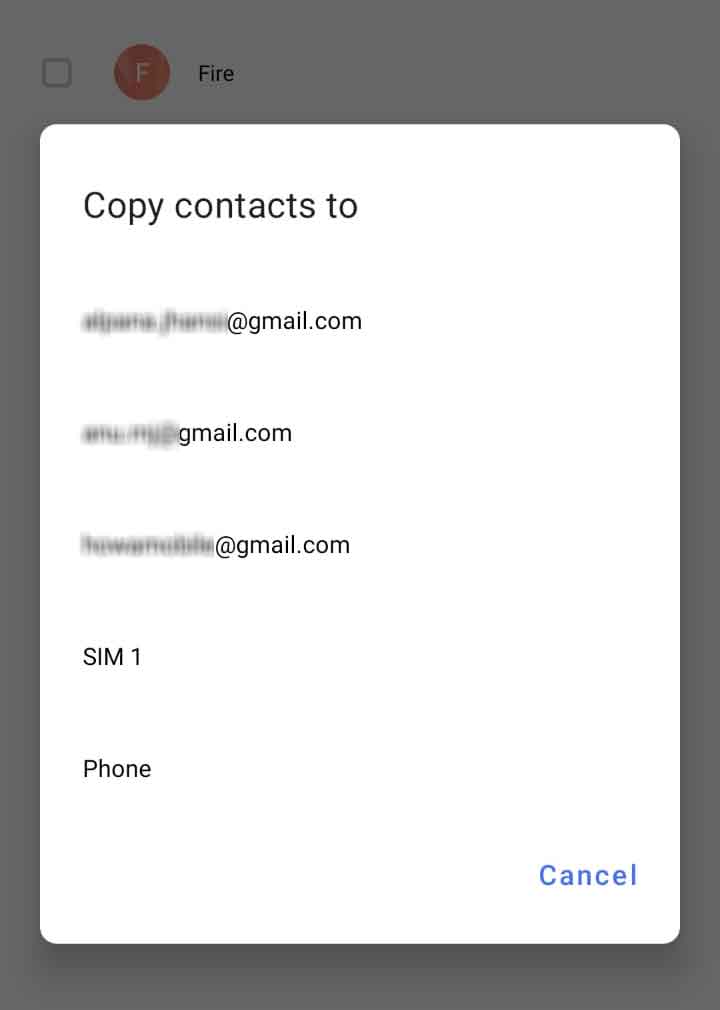
The will copy all the selected contacts from SIM card to the preferred location.
How To Transfer Contacts From Android to Android?
SIM card Is A Good Source To Store Contacts On Android
You can save your contacts on your SIM card and access them whenever you need them just like that.
As finding the location of the contacts on your Android phone is a bit complicated, you can store them on your SIM card to avoid probable trouble.
Storing contacts on a SIM card is much more convenient when it comes to transferring contacts between two phones or switching from one device to another.
But in order to store contacts, you must have exported them from the phone’s internal device. Let’s look at the process step by step.
Contacts Can Be Stored On SD Card
If you insert an external memory card which is commonly known as an SD card on your Android phone, then there is a chance your contacts get stored on your SD card.
To check the possibility, you need to remove the card from your phone and place it on another device to see if you export the contacts.
3 Methods to Send Text to Multiple Contacts on Android
Where are Android Contacts Stored in Google
In today’s world, most people use the internet, and to keep their important information safe, they use something called cloud storage. It’s like a digital space where you can put your stuff. Putting your Android phone contacts in Google’s cloud storage is easy and handy. And it’s not just for contacts; you can put lots of different things there.
Just like everyone else, you get 15 GB of space on Google’s cloud for free. You can use this space to keep your contact list safe. To do that and also to organize it, follow these steps:
- Open your phone’s settings.
- Scroll down and tap on “Accounts” or “Accounts and Backup.”
- Choose “Google.”
- Select your Google account (or add one if you haven’t already).
- Make sure the “Contacts” option is turned on.
This will automatically sync your contacts to Google’s cloud storage.
That’s it! Your contacts are now safely stored in the cloud, and you can manage them easily.
You can access all the saved contacts from Android to your Google account by visiting contacts.google.com.
How to Export Contacts on Android?
To export contacts from your Google account on an Android device, you can follow these steps:
Export Contacts on Android from Google Account
- Open the Contacts App: Locate and open the “Contacts” app on your Android device. The icon typically looks like a blue or multi-colored address book.
- Access Contact Settings: Depending on your phone’s manufacturer and Android version, you may need to tap the three horizontal lines (menu icon), three dots, or find a “Settings” option within the app.
- Choose Google Account: Ensure that your Google account is selected as the source for contacts. If not, tap on the account drop-down menu and select your Google account.
- Select Contacts to Export: You can typically select individual contacts or tap “Select All” to export all of them.
- Export Contacts: Look for an option like “Export,” “Export Contacts,” or “Share Contacts.” The wording may vary depending on your phone.
- Choose Export Format: Select the export format. To export to a file that can be easily imported into other applications or devices, choose “Export to .VCF” or “VCard.” This format is widely supported for contacts.
- Select Storage Location: You may be asked where you want to save the exported contacts. Choose a location on your device or external storage (e.g., SD card).
- Confirm and Export: Confirm your selection, and the contacts will be exported as VCF files to the chosen location.
Is It Essential To Back Up Contacts From Android To Other Sources?
You cannot blow out the possibility of bricking or losing your phone. In that case. You should always back up your contacts on diverse sources if possible.
Otherwise, your sorrows will have no bounds when you need to communicate with your essential contacts.
So, always try to keep backing them up using your Google account, personal computer, etc. It will prove unbelievably helpful when you encounter the horrible situation we just mentioned.
How Do I Back up My Android Phone Contacts?
Back-Up Android Contacts to Google Drive
- Open Settings: Find and tap the “Settings” app on your Android phone. It usually looks like a gear or a cogwheel.
- Scroll Down: Scroll down in the Settings menu to find and tap on “Accounts” or “Accounts and Backup.” The exact wording may vary depending on your phone’s manufacturer and Android version.
- Choose Your Google Account: If you’re not already signed in to a Google account, you’ll need to add one. If you’re already signed in, select your Google account.
- Sync Contacts: Look for an option like “Sync Account” or “Sync Contacts” within your Google account settings. Make sure it’s turned on. This will automatically back up your contacts to your Google account.
- Verify Backup: To double-check that your contacts are backed up, go to the Google Contacts website (contacts.google.com) on a computer or use the Google Contacts app on another device. Sign in with the same Google account, and you should see your contacts there.
Your Android phone contacts are now backed up to your Google account. If you ever get a new Android phone or need to restore your contacts, just sign in with the same Google account, and your contacts will be synced back to your device.
Back-Up Android Contacts to Computer
To back up your Android contacts to your computer, you can use various methods, but one common way is to export them to a file format like CSV (Comma-Separated Values). Here’s how you can do it:
Using Google Contacts:
- On Your Android Phone:a. Open the “Contacts” app on your Android device.b. Tap the three horizontal lines or “Menu” icon to access the settings.c. Choose “Settings” or “Manage Contacts.”d. Select “Export” or “Export contacts.”e. Choose the Google account associated with your contacts.
f. Select the format as “CSV (comma-separated values).”
g. Tap “Export” or “Save.”
- On Your Computer:
a. Connect your Android device to your computer using a USB cable.b. On your computer, open a web browser and go to Google Contacts (contacts.google.com).c. Sign in with the same Google account used to export the contacts from your phone.
d. Click on the “More” option in the left sidebar.
e. Choose “Import.”
f. Click on “Select file” and choose the CSV file you exported from your phone.
g. Click “Import.”
Your contacts are now backed up on your computer as a CSV file.
Alternatively, you can use third-party software to back up your Android contacts to your computer. These tools often provide more options and flexibility in managing your contacts, but make sure to use reputable software to protect your data.
How Do I Export Contacts from Android as VCF Files?
To export contacts from your Android device as VCF (Virtual Contact File) files, you can follow these steps:
Using the Contacts App:
- Open the Contacts App: Locate and open the “Contacts” app on your Android device. The icon usually looks like a blue or multi-colored address book.
- Access Contact Settings: Depending on your phone’s manufacturer and Android version, you may need to tap the three vertical dots (menu icon) or find a “Settings” option within the app.
- Select Contacts to Export: Choose the contacts you want to export. You can typically select individual contacts or tap “Select All” to export all of them.
- Export Contacts: Look for an option like “Export,” “Export Contacts,” or “Share Contacts.” The wording may vary depending on your phone.
- Choose VCF Format: Select the “VCF” or “VCard” format when prompted. This will export the selected contacts as VCF files.
- Select Storage Location: You may be asked where you want to save the VCF files. Choose a location on your device or external storage (e.g., SD card).
- Confirm and Export: Confirm your selection, and the contacts will be exported as VCF files to the chosen location.
Now, you have successfully exported your Android contacts as VCF files. These files can be transferred to other devices or backed up for safekeeping.
How To Change Default Contact Save Location on Android
Changing the default contact save location on Android can vary slightly depending on your device and Android version. Here are the general steps to change the default save location:
Method 1: Changing the Default Save Location for New Contacts
- Open the Contacts App: Launch the “Contacts” app on your Android device.
- Access Contact Settings: Depending on your phone’s interface, you may need to tap the three horizontal lines (menu icon), three dots, or find a “Settings” option within the app.
- Change the Default Storage Location: Look for an option related to “Default storage location” or “Contact storage location.” Tap on it.
- Select the Storage Location: You will likely be presented with options such as “Phone,” “Google,” “SIM card,” or other accounts if you have them configured. Choose the desired storage location for new contacts. For example, selecting “Google” will save new contacts to your Google account by default.
- Save Changes: Once you’ve selected the preferred storage location, save the changes. The method to save changes may vary depending on your device.
Now, any new contacts you create will be saved to the location you selected as the default.
Method 2: Changing the Storage Location for Existing Contacts
If you want to change the storage location for existing contacts, follow these steps:
- Open the Contacts App: Launch the “Contacts” app on your Android device.
- Access Contact Settings: Tap the three horizontal lines (menu icon) or the three dots to access the menu options.
- Manage Contacts: Choose an option like “Manage contacts” or “Manage contacts storage.”
- Select Contacts to Move: You may need to select the contacts you want to move. Some devices allow you to select all contacts at once.
- Move Contacts: Look for an option like “Move” or “Change storage location.” Select this option.
- Choose the New Storage Location: Pick the new storage location where you want to move the selected contacts (e.g., from Phone to Google).
- Confirm and Move: Confirm your choice and proceed with the move.
The selected contacts will now be moved to the new storage location you specified.
Keep in mind that the exact steps and terminology can vary depending on your Android device’s manufacturer and software version. If you can’t find these options, consult your device’s user manual or search for specific instructions based on your device model and Android version.